How To: Find Input Cursor Position with JavaScript
A rather specific scenario here. But, how do you get the location of the cursor in a textarea? or an input? There is no straightforward method or property that can you can utilise. You can get selection indexes but these don’t give you the actual cursor location.
For those in camp TL;DR; do some trickery 🐇 by cloning the input and getting the position of the appended span. Here’s a demo! 🎉
Check out this pen by Jhey (@jh3y) on CodePen.
And here's a React Hook for it!
Why? permalink
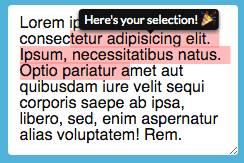
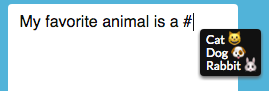
Use cases where you need to show some custom UI at the exact location where the user is interacting. Popular examples include type aheads such as those for Github issues and Twitter hashtags. Or interactive tooltips likes those on the Medium WYSIWYG editor.
How? permalink
The concept is actually pretty simple.
- Create a replica element of our
textarea/inputwith near identical styling. - Generate a substring of the
textarea/inputtext content up to the point of the caret. - Populate the replica element with that substring.
- Append a
spanelement that contains the rest of the content. - Append the replica element to the
DOM
The position of the cursor is the position of the appended span 💡 Once we have the position of the span, we need to remove the replica element from the DOM. Note, the position of the span will be relative to the replica element. To get the absolute positioning on the page of the cursor we will also need to account for the location of the input/textarea. This is critical so that we don’t have to start wrapping our input elements and allows us to append our custom UI to the document.body 👍
This is the foundation for finding the cursor position. We can refer to it as the foundation cursor position. It does not consider potential scroll position, custom styling or our desired behavior.
Those calculations are best made to the obtained foundation cursor position.
For example, you may want to show custom UI beneath the cursor or center aligned above the cursor. In both use cases, you will need the foundation cursor position before anything else. We will look at different implementations below.
Code permalink
So how does that code look for obtaining the foundation cursor position? 🤓
/**
* returns x, y coordinates for absolute positioning of a span within a given text input
* at a given selection point
* @param {object} input - the input element to obtain coordinates for
* @param {number} selectionPoint - the selection point for the input
*/
const getCursorXY = (input, selectionPoint) => {
const {
offsetLeft: inputX,
offsetTop: inputY,
} = input
// create a dummy element that will be a clone of our input
const div = document.createElement('div')
// get the computed style of the input and clone it onto the dummy element
const copyStyle = getComputedStyle(input)
for (const prop of copyStyle) {
div.style[prop] = copyStyle[prop]
}
// we need a character that will replace whitespace when filling our dummy element if it's a single line <input/>
const swap = '.'
const inputValue = input.tagName === 'INPUT' ? input.value.replace(/ /g, swap) : input.value
// set the div content to that of the textarea up until selection
const textContent = inputValue.substr(0, selectionPoint)
// set the text content of the dummy element div
div.textContent = textContent
if (input.tagName === 'TEXTAREA') div.style.height = 'auto'
// if a single line input then the div needs to be single line and not break out like a text area
if (input.tagName === 'INPUT') div.style.width = 'auto'
// create a marker element to obtain caret position
const span = document.createElement('span')
// give the span the textContent of remaining content so that the recreated dummy element is as close as possible
span.textContent = inputValue.substr(selectionPoint) || '.'
// append the span marker to the div
div.appendChild(span)
// append the dummy element to the body
document.body.appendChild(div)
// get the marker position, this is the caret position top and left relative to the input
const { offsetLeft: spanX, offsetTop: spanY } = span
// lastly, remove that dummy element
// NOTE:: can comment this out for debugging purposes if you want to see where that span is rendered
document.body.removeChild(div)
// return an object with the x and y of the caret. account for input positioning so that you don't need to wrap the input
return {
x: inputX + spanX,
y: inputY + spanY,
}
}Pretty much like that 😉
So what’s happening there?
We’ve gone over the basic concept in “How?” but let’s walk through what’s happening;
- Pass the
input/textareaalong with the selection index as params to ourgetCursorXYmethod - Create a replica
divand copy the styling of ourinputby looping over the returnedObjectfromgetComputedStyle - Fill that replica
divwith a substring of text content up until the selection index - Create a
spanelement and give it the text content of the remaining text content not included in the substring - Append that
spanto the replicadiv - Append that replica
divto theDOM - Obtain the location of the cursor 🎉
- Remove the replica element from the
DOM - Return the text cursor position accounting for the
inputposition on the page 👍
Real scenarios permalink
Cool, but how can we use this in real scenarios and how does the HTML work, can I just use this on an a plain input/textarea? 🤔
Yes! You can. Using the getCursorXY method against your input will give you the correct cursor location. It is then up to you what you do with the location.
Showing the cursor position on input and click permalink
Let’s walk through one of the demo scenarios.
The desired behavior is that whenever we type or click, there will be an indicator showing the cursor.
So, on input and click we need to append a marker element to the document body if there isn’t one. We also need to calculate the correct position for that marker on every input or click. As a bonus, if we click off of the input, we want the marker to disappear.
/**
* shows a position marker that highlights where the cursor is
* @param {object} e - the input or click event that has been fired
*/
const showPositionMarker = e => {
// grab the input element
const { currentTarget: input } = e
// create a function that will handle clicking off of the input and hide the marker
const processClick = evt => {
if (e !== evt && evt.target !== e.target) {
toggleMarker()
}
}
// create a function that will toggle the showing of the marker
const toggleMarker = () => {
input.__IS_SHOWING_MARKER = !input.__IS_SHOWING_MARKER
if (input.__IS_SHOWING_MARKER && !input.__MARKER) {
// assign a created marker to input
input.__MARKER = createMarker('Here I am! 😜', 'position')
// append it to the body
document.body.appendChild(input.__MARKER)
document.addEventListener('click', processClick)
} else {
document.body.removeChild(input.__MARKER)
document.removeEventListener('click', processClick)
input.__MARKER = null
}
}
// if the marker isn't showing, show it
if (!input.__IS_SHOWING_MARKER) toggleMarker()
// if the marker is showing, update its position
if (input.__IS_SHOWING_MARKER) {
// grab the properties from the input that we are interested in
const {
offsetLeft,
offsetTop,
offsetHeight,
offsetWidth,
scrollLeft,
scrollTop,
selectionEnd,
} = input
// get style property values that we are interested in
const { lineHeight, paddingRight } = getComputedStyle(input)
// get the cursor X and Y from our helper function
const { x, y } = getCursorXY(input, selectionEnd)
// set the marker positioning
// for the left positioning we ensure that the maximum left position is the width of the input minus the right padding using Math.min
// we also account for current scroll position of the input
const newLeft = Math.min(
x - scrollLeft,
(offsetLeft + offsetWidth) - parseInt(paddingRight, 10)
)
// for the top positioning we ensure that the maximum top position is the height of the input minus line height
// we also account for current scroll position of the input
const newTop = Math.min(
y - scrollTop,
(offsetTop + offsetHeight) - parseInt(lineHeight, 10)
)
input.__MARKER.setAttribute('style', `left: ${newLeft}px; top: ${newTop}px`)
}
}This is a basic demo, it’s not polished 💍 by any means 😅
The important things to take notice of here is what we do with the returned cursor position for our input.
In this scenario, we get the foundation cursor position first. But then we account for any custom styling and any scrolling that may have happened. Using Math.min we can ensure that there is a limit on the markers position in certain directions. Consider the left position. We don’t want the marker to go any further left than the furthest right of the input minus any padding so we limit that. In the demo, I’ve applied a basic position to the marker and then offset the indicator using basic CSS transforms 🤓
As an added bonus, when we create the marker, we add an event listener to the document.body to listen for clicks. This is so that when we click off of the input the marker can be removed from the DOM.
That is one basic scenario we can use our obtained cursor position in. See the demo for other possible use cases such as type aheads and selection highlighting.
Wrapping up permalink
Not the most common article topic. But, an interesting problem with an interesting solution that I felt was worthy of sharing.
Be sure to check out the demo and code 🤓
Check out this pen by Jhey (@jh3y) on CodePen.
Hopefully this can help you out if you come across the same problem. There may indeed be better ways to solve this and if you find one I’d certainly like to see it 👍 😃